
Last weekend I picked up Julian Shapiro’s book: Web Animations using Javascript. I had never tried coding any web animations before and thought this was a good place to dip a toe. The book in itself is a great read and covers a lot of the fundamentals of motion design and how animation works on browsers. Julian Shapiro is also the creator of velocity.js, a javascript library that makes it really easy to animate elements with just a few lines of code. The book is peppered with examples on how to code common UI elements using the velocity.js library.
A few days ago I decided to try building something simple myself using my newfound animation knowledge. This post isn’t a tutorial, but rather my experience on creating this application and using the velocity.js libraries.
Before delving into the details you can:
Getting Started
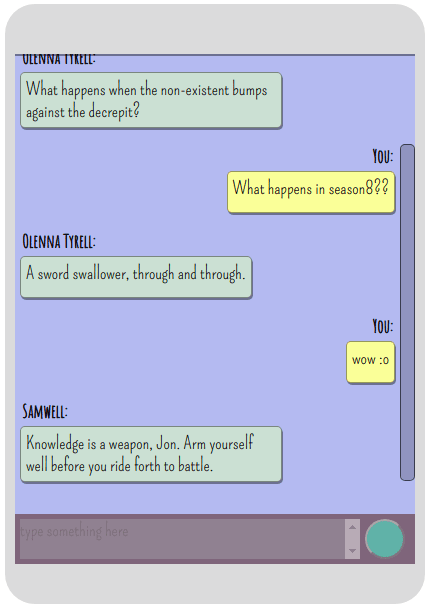
I knew I wanted to create a chat interface of some sort. Initially I was just going to use this lorem ipsum text API to create some response text, but then I found this awesome API on github that returns a quote from The Game Of Thrones series along with the character that said it. Of course I had to use it.
I used velocity.js to create the animated text bubbles, a glowing send button as well as some color changes for the background
Additionally, I stumbled upon ityped.js ,which is a library that creates animated text. I used this to signify when someone was typing. It’s a really interesting library that can easily animate strings
Here’s a list of links to resources I found helpful
- Velocity.js official documentation
- Blast.js – another library helpful for creating text effects.
- ityped.js
- Game of thrones quotes API
- Google fonts
The Layout


The HTML of this is simple. I created one div to hold everything. Inside this was a div txtcontainer which is going to hold all message divs. Any new messages would be appended to newmsgs. The btbar holds an input text box and a send button.
Styling the layout
I added the width and height properties to the elements. I also created a custom scrollbar for the txtcontainer div. The message divs would flow left or right depending on who the message sender was.

However create custom scrollbars with caution, not all browsers support webkit.

I used some fonts from google fonts too. Finding the style I liked took some trial and error but I finally settled on a rounded div with a semi-transparent shadow.
Setting the max-width to a certain value ensures that the div is not too large, setting the overflow-y to auto ensures the div can resize as required
Javascript Logic.
Since this was just a demonstration to test out web animation, the logic for this is quite rudimentary. An ajax call is made to the API and the returned Json object is stored into variables. The showtype() function is then called which demonstrates ityped.js typing function and that in turn calls print() which just appends a div with to the newmsgs div.
The function loaddata is called whenever the send button is pressed. Additionally a function mysvis() is called to display the text you entered, if you did enter any text into the input text box.


Of course, you wouldn’t have a showtype() function in an actual chat application because that would just create an unnecessary delay, however I put it in here because an ajax call is relatively quick ( faster than a person typing). You can of course create a websocket connection, if you’d like to chat with another person instead of just receiving Game Of Thrones quotes.
The Animation:
1.The Send Button
The send button just continuously glows to lure users into clicking it and thus sending the ajax call. To do this I just continuously varied the opacity between 0.5 and 1.

2.The Background
Since velocity allows granular control over colors, I tried animating a background that slowly transitions its colors.

3.The text bubbles
I wanted the text bubbles to pop out onto the screen. Using velocity to create a transition from 0 opacity and 0 size to full opacity and full size gave me the effect I wanted

4. The typing bar
At first I was going to append the text with Jquery, use blast.js to blast apart the text word by word and then use velocity’s stagger effect to create the animation I wanted. However this seemed to be overkill since I just wanted to animate simple strings at a desired location. Luckily ityped.js was exactly what I needed to do this.
Concluding thoughts
Velocity.js is really a powerful library that you can use to create super smooth animations. Not only this, but I was pleasantly surprised at how little code I had to write to create these animations.
However there are a few caveats that I stumbled upon. Firstly easing no longer seems to work with velocity.js 2.0.0 . This is a known bug , as you can see here. As a workaround I simply used velocity 1.4.3 which seems to be the last stable release. This worked fine.
Secondly particle animation becomes overly complicated to do. HTML Canvas would be a much easier way to do this.
I still would like to try out its svg capabilities and see how that works out as well as chaining two or more animations together.
Overall, velocity.js is great for animating small components of your website, for example scrolling effects and is quite performant in these areas. Its also a good place to start experimenting with animation since the code is really simple and logical to write.
I hope you enjoyed this post, and if you have any questions or feedback, do let me know in the comments :).
